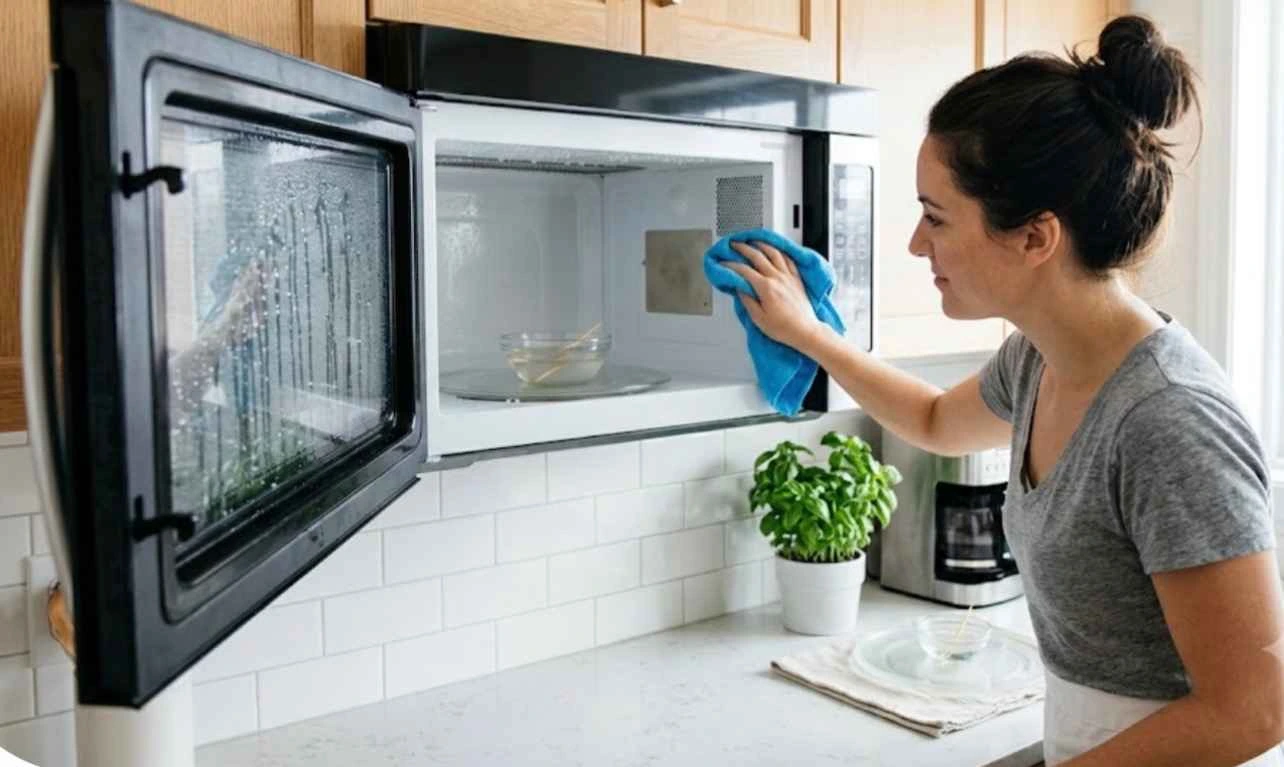
We all experienced a bowl of spaghetti exploding or a mug of oatmeal boiling over, leaving a hard, baked-on crust that looks in the microwave, which looks impossible to remove. The first thing that comes to mind to clean it is to grab a heavy sponge and do scrubbing until everything is removed.
Don’t do that because aggressive scrubbing can cause lining in the appliances, and it is also not the only solution. If you want to know how to clean a microwave without getting tired, then the secret isn’t elbow grease; it’s science.
By using things that are found in every household, like vinegar, lemon, or baking soda, you can clean the steam chamber that is considered the most stubborn thing; it can be cleaned in just 10 minutes.
In this guide we will look at everything step-by-step in the masterclass, understanding how to steam-clean a microwave safely. Sanitize high-touch keypads, wash greasy filters, and remove odors like burnt popcorn.
The Science of Steam: Why Natural Cleaning Wins
When you know how to clean the microwave, you usually go for a heavy-duty chemical spray to remove the mess; however, it is important to understand the chemical science of microwaves before doing anything. Natural steam is a safer method than chemicals.
1. The Physics of Moisture Penetration
The most common dirt on microwaves is baked-on proteins, starches, and fats. This happens when food explodes and the dry water evaporates, leading to tight-bound, harder organic matter that stays on the interior walls of the microwave.
When you use a bowl filled with water and let it boil in the microwave, you make a highly localized thermal humidification. The water molecules are very small when it’s steam; these small molecules go in the hardened food crust and lead to rehydrating them. The heat comes from steam, making food particles soften. This weakens the chemical bond of food with the walls, leading to wipeable gel.
2. The Chemistry of Natural Solvents
Water steam is a good option, but you can also add natural ingredients such as vinegar or lemon juice to create a chemical reaction that easily dissolves grease. White vinegar is 5% acetic acid, which means it can effectively break down animal fats and vegetable oils. It helps in removing grease.
Citric acid (lemon juice) is considered a natural dissolver that removes grease. Another beneficial chemical option is baking soda. When heated, the baking soda releases carbon dioxide gas and agitates stuck-on food.
Why Commercial Chemicals Are a Microwave Hazard
I would never recommend you use bleach or oven cleaners inside a microwave. The main reason is microwaves are sealed environments, so when you spray harsh chemicals in them, they can trap them in it. When you heat food next time, these trapped chemicals will enter the meal and make the food contaminated.
The interior walls of the microwave are coated with enamel and stainless steel to reflect the radio frequency (RF) waves. The hard chemicals can corrode this coating, which results in peeling, rust, and even electrical sparks.
The Steam-Clean Triad: Pick Your Method
Not every microwave has the same mess; some that have stubborn, oily curry splatter need a different technique. For this we need to take a quick look at the chart below to choose the right and natural cleaning agent.
| Cleaning Agent | Primary Active Component | Best For | Odor Impact | Cost & Accessibility |
|---|---|---|---|---|
| White Vinegar | Acetic Acid (CH3COOH) | Heavy, baked-on grease & dried oil splatters | Strong, sharp, sour smell (dissipates in ~1 hour) | Ultra-low cost; pantry staple |
| Fresh Lemon | Citric Acid (C6H8O7) | Mild grease, sanitizing & heavy deodorizing | Fresh, clean, citrusy scent | Low cost; requires fresh fruit |
| Baking Soda | Sodium Bicarbonate (NaHCO3) | Neutralizing burnt smells & lifting stubborn food stains | Completely neutralizes odors (leaves no scent) | Ultra-low cost; excellent dry abrasive |
Method A: The Classic Vinegar Steam (Maximum Degreasing Power)
This is a heavy-duty method; the white vinegar works as a powerful solvent that chemically breaks the fat chains. This is the reason why this method is a perfect choice for deep cleaning a microwave.
All you need is 1 cup of water, 2 tablespoons of white vinegar, a ceramic bowl, a wooden toothpick, and a clean microfiber cloth.
Steps to follow:
- First make an acidic solution: take 1 cup of water and add 2 tablespoons of white distilled vinegar in a safe bowl. Also add a wooden toothpick into it.
- Place the bowl into the center of the microwave, then close the door and heat the microwave for 3 to 5 minutes. This is the main step because the liquid will be heated and make a thick acidic condensation.
- Once the time is done, don’t open the microwave; leave it for 15 more minutes. This step will chemically loosen the hardened grease splatters.
- Carefully open the door, then remove the hot bowl. Take out the bowl and use a damp cloth to wipe the interior ceiling first, then the walls and floor.
Method B: The Fresh Lemon Steam (Best for Deodorizing & Freshness)
Many people don’t like the sharp smell of vinegar, so if you also don’t like it, then lemon juice is the perfect choice for you. The natural citric acid cuts the grease completely; the essential oils in lemon peel vaporize, resulting in a natural citrus fragrance.
All you need is a cup of water, 1 lemon, a sharp knife, a clean cloth, and a microwave-safe glass or ceramic bowl.
Steps to follow:
- First cut the lemon in half, then squeeze the juice in 1 cup of water in the bowl. Once lemon juice and water mix, it releases aromatic oils.
- Place the bowl into the microwave and set it for 5 minutes. Make sure the water boils completely and steam goes on the wall. Keep the door closed for 15 minutes. The hot steam of lemon will break the hard dirt.
- Lastly, open the door and remove the hot bowl and wipe down the areas. The citric acid will leave a beautiful shine inside the microwave.
Method C: The Baking Soda Steam (Best for Burnt Smells & Stubborn Stains)
Baking soda is a mild alkali. Vinegar and lemon are good for grease, but alkaline solutions are also best for neutralizing acidic odor molecules. This method also provides scrubbing paste, which works best for the toughest spots.
All you need is 1 cup of water, 2 tablespoons of baking soda, a ceramic bowl, a non-abrasive sponge, and a clean microfiber cloth.
Steps to follow:
- Take 2 tablespoons of baking soda and add it to 1 cup of water in the bowl. Stir it until the baking soda is fully mixed in water and it looks cloudy. Microwave the mixture for 4 minutes so it starts to boil.
- Let the door close for 10 minutes. The baking soda particles will coat the inside wall and absorb bad odors.
- You can carefully remove the bowl if there are extreme sugar or burn spots in your microwave, which can’t go from a normal wipe, and then you can also use a sponge dipped in dry baking soda to make a paste and then rub the sponge on affected areas.
- Finish the process by wiping the interior with a microfiber cloth.

Deep-Cleaning the Hardware (The Parts Most People Skip)
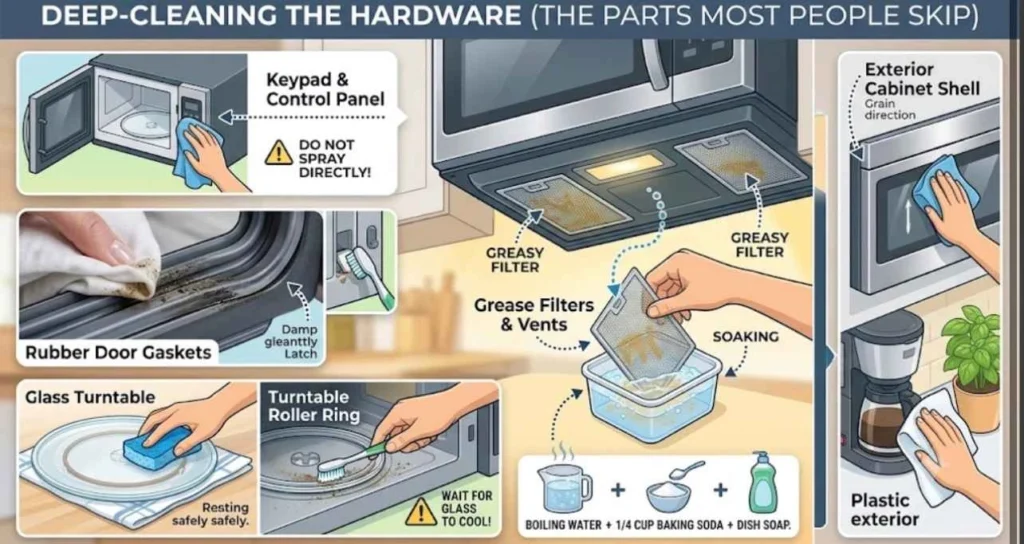
Wiping the flat walls is half of a battle; the other one is to deeply clean the microwave, which needs structural components that remove the hidden grease, food pathogens, and dust.
If you don’t do this deep cleaning, the microwave will trap all bad odors of the kitchen. Its working part will wear out faster, and ventilation will tank.
1. The Glass Turntable & Guide Roller Ring
The glad’s turntable is the main place where food spills over. The sugary sauces and oils drip on the plate, which bakes onto the underside of glass and gets directly into plastic ring wheels below, leading to grease.
The Thermal Shock Warning: Make sure you always let the glass plate cool down before removing it because if you place a hot glass turntable into cool sink water, it can lead the glass to crack due to thermal shock.
Deep-Cleaning the Glass: Wash the glass turntable in soapy dishwater and use a sponge to scratch it. For crusty rings on the bottom, use baking soda by sprinkling it and let it sit for 5 minutes, then scrub gently.
Servicing the Roller Ring: First remove the small plastic ring with wheels where the dust and other things build up, leading to jerks and stalls in the turntable. Wash the roller ring gently with soapy water. Do put the plastic track onto the microwave floor before adding the wheel back.
2. The Door Gaskets & Latches
When you go for deep cleaning, you notice there is a thick rubber or vinyl gasket near the microwave door, which is for a safety function. It helps in preventing microwave radiation from going out. If grease builds up on this seal, the door won’t close completely, leading to a potential safety hazard.
The Gentle Clean: Dip a microfiber cloth into warm water and add one drop of mild dish soap. Use the cloth on the whole surface, especially on greasy areas. Avoid vinegar, bleach, or any chemical spray on the rubber gasket because these harsh acids can degrade the quality of rubber over time, leading to cracks.
The Latch Holes: Food debris often takes place in latch holes where the door hooks insert. All you need is to use a dry and soft toothbrush to clean the holes. Avoid using liquid cleaners, as they are sensitive to electrical switches.
3. The Control Pad & Exterior Shell
The keypad is one of the most touched surfaces in the kitchen, so the chances of bacteria in it are quite high. Avoid any liquid cleaner on it directly, as it can seep behind the area and cause your appliance to brick. Take a clean microfiber cloth and add a 50/50 mixture of water and rubbing alcohol until it gets damp. Wipe the area completely with alcohol. It sanitizes and evaporates quickly.
Polishing Stainless Steel: If you have a stainless steel microwave, then use a stainless steel spray or a single drop of olive oil on a dry cloth—make sure to wipe it in the metal grain’s direction so there will be no scratches or smudges.
4. Over-the-Range Microwaves: The Range Hood Grease Filters
If the microwave is near the stove, then it will pull double duty on the range hood because the exhaust fan on the underside lets the heavy grease stay in it; due to the near stove, the steam and smoke come into the microwave area. Over time the aluminum filters get choked with a heavy layer of yellow grease, which leads to blockage of airflow and kitchen smells, and the fan motor can overheat.
The No-Scrub Filter Degreasing Method
Don’t try to use a scrub brush on these filters, as it will tear the metal mesh. Instead do other things.
Remove the filters from the bottom of the panel and fill the kitchen sink with boiling water. Add baking soda and a degreasing dish soap. The water will fizz as these elements dissolve.
Now put the greasy filters in it; let them soak for 15 to 20 minutes. You will see the yellow grease is coming out and floating in water. Rinse the filters under water. Take them out and let them dry before sliding them back into place.
Troubleshooting & Niche Solutions
Here is a detailed step-by-step guide for the three advanced microwave troubleshooting scenarios.
1. How to Remove a Stubborn Burnt-Popcorn Smell
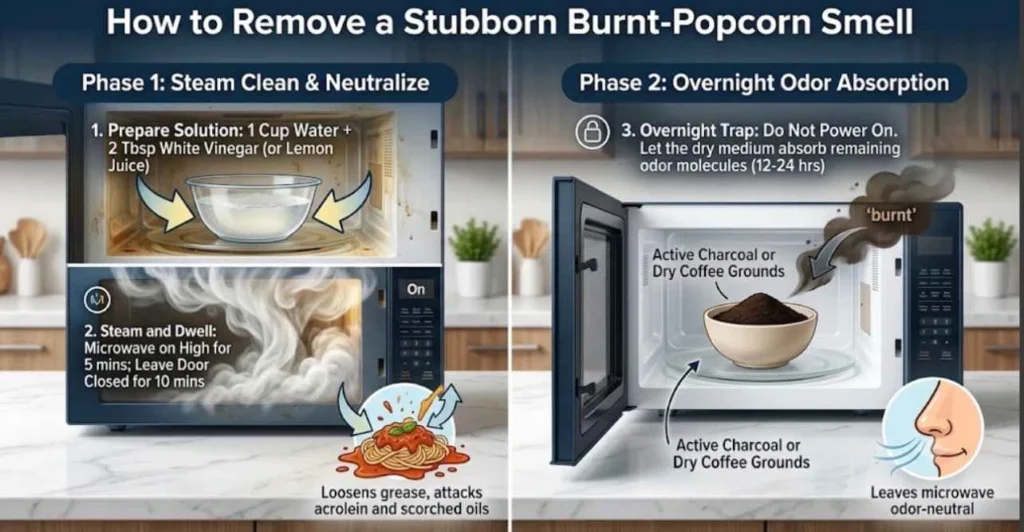
Some household odors are difficult to remove, and the smell is like burnt popcorn. The main reason behind it is corn kernels have oils and sugar in them; when scorched, they release acrolein and carbonaceous particulates, which take place as greasy particles on the wall of the microwave.
To get rid of this odor, you can’t just simply wipe the wall because the odor molecules are trapped inside the pores of the microwave wall. You can use a double approach like a chemical breakdown phase and dry absorption phase.
Phase 1: The Acidic Vapor Clean (to break down grease bonds)
First mix 1 cup of water and add 3 tablespoons of white distilled vinegar into a bowl. Add 1 tablespoon of vanilla extract. Put the bowl inside it and let the microwave heat for 5 minutes. Keep the door close for 20 minutes. Remove the bowl and wipe down the surface with a clean cloth.
Phase 2: The Dry Absorption Phase (to pull remaining odors from the plastic)
If the smell is constant, then you need a dry and porous medium that can absorb the remaining airborne particles overnight. Make sure you don’t turn on the microwave in this phase. You have three options to get rid of this odor completely.
- The first option is to add 2 to 3 active charcoal briquettes in an open bowl inside the microwave.
- The second option is to add 1/2 cup of dry, fresh coffee grounds in an open bowl. Let it stay in the microwave.
- The third option is to add the entire newly opened box of baking soda in the center of the microwave.
- Choose what option you can easily do with the available product and let the microwave door close for 12 to 24 hours.
2. How to Fix a Yellowed Microwave Interior
When microwaved, the plastic components like the door, frame, handle, and inner liner turn yellow; however, this discoloration isn’t dust but a chemical reaction.
The plastic in most appliances is acrylonitrile butadiene styrene with brominated flame retardants. The grease absorbs these chemicals and is converted by heat in the process, resulting in a color change over time. For this you can use a hydrogen peroxide cream formula; this will reverse the yellow-turning process.
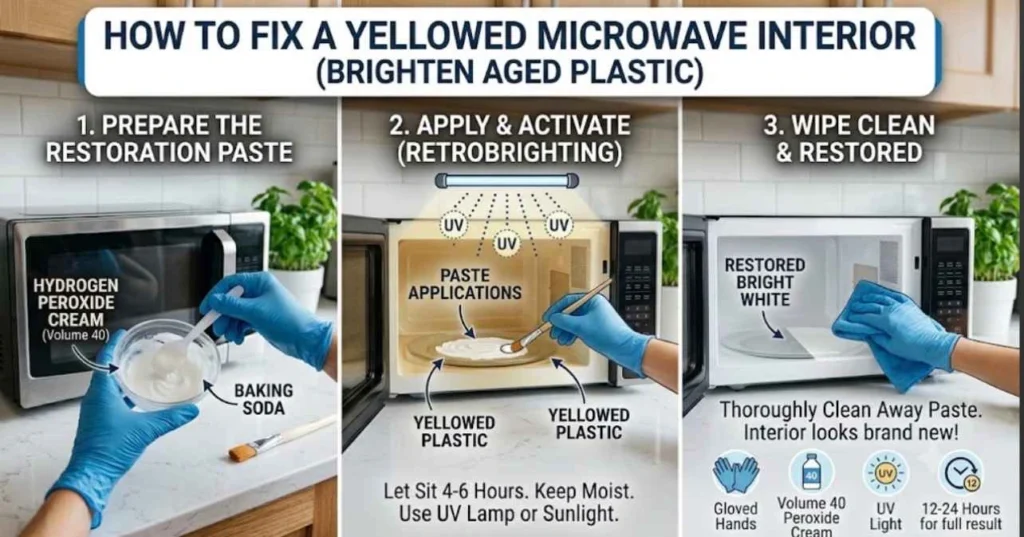
Don’t try to scrub this yellow color with the help of soap. You can use a technique known as Retrobrite” (or Retrobrighting).
The Hydrogen Peroxide Restoration Method
For this, all you need is a developer cream (volume 40), which contains 12% hydrogen peroxide is easily available at home if you dye your hair or at a salon. The consistency of this cream is extremely thick; it clings to vertical plastic walls without dripping.
Other things you need are plastic wrap, a paintbrush, rubber gloves, protective eyewear and a UV lamp.
Step-by-Step Process:
First wash the yellow plastic with the help of soap and water to remove the grease, then dry it completely. Before applying cream, cover your hands with gloves and eyewear. Use a brush and paint a thick layer of cream on yellow plastic. Make sure the cream doesn’t pass on a metallic surface or near an electric switch. Seal it with plastic wrap so the hydrogen peroxide doesn’t evaporate.
Place the microwave in sunlight for 2 to 4 hours, as hydrogen peroxide needs active UV light. If you can’t move the microwave set, put the UV lamp on the plastic for 6 hours.
Remove plastic wrap and clean the dried cream with the help of a microfiber cloth. And you will see all that was yellow back to the colour white.
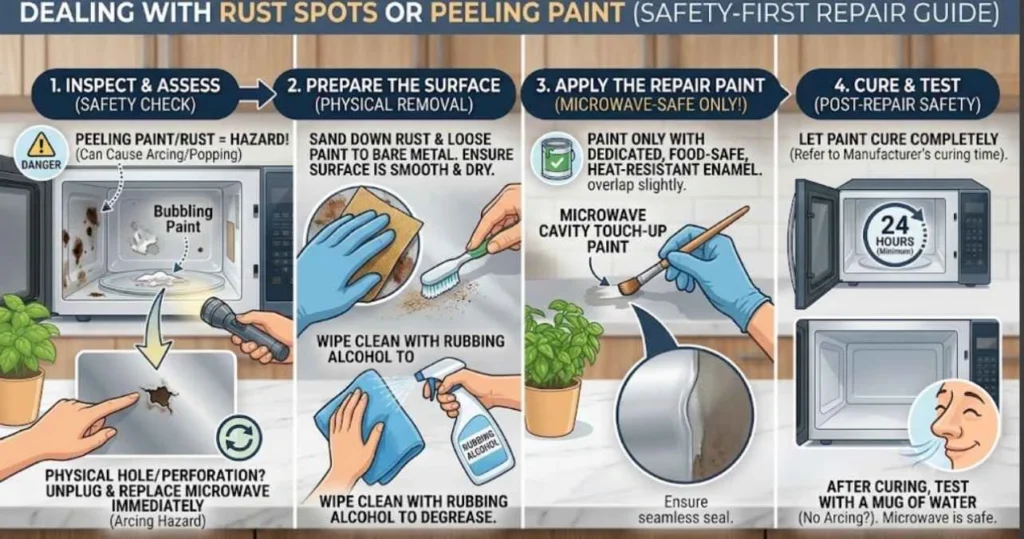
3. Dealing with Rust Spots or Peeling Paint
If you look at the microwave and notice the paint inside it is peeling, bubbles have formed, or there is rust, then you are dealing with a maintenance issue. This isn’t just a simple problem but a main hazard. Peeling paint leads to metal exposure, and if it is left untreated, then the metal will cause electrical sparks.
The Step-by-Step Restoration Guide
If you notice the rust has taken over all the metal walls, then the microwave is completely done and needs replacement. However, if the rust is only on the surface, then you can repair it by following the step.
All you need is fine-grit sandpaper and rubbing alcohol, microwave cavity touch-up paint and a small paintbrush.
First unplug the microwave, then use sandpaper to scrape the rusted or peeling area. Make sure you remove flaky paint completely from edges.
Wipe away the metal dust with the help of a cloth that is damp in rubbing alcohol. Let it dry for 5 minutes.
Now use a small brush and apply a thin layer of paint on the metal area. Let the paint dry for 24 to 48 hours; don’t use the microwave until the paint is completely dry.
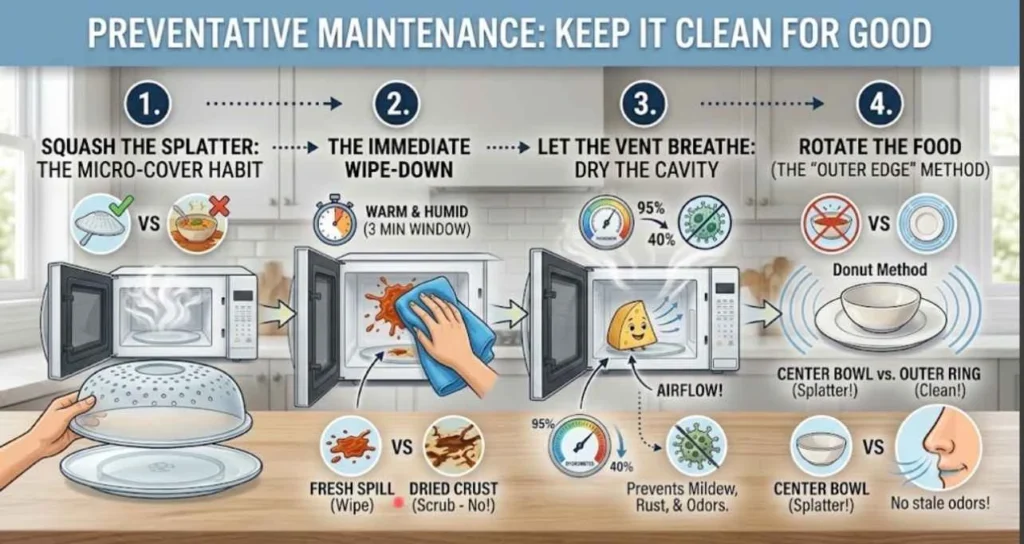
Preventative Maintenance: Keep It Clean for Good
The best trick to keep the microwave clean is to prevent it from letting the dirt come inside. For this you need to follow some steps.
1. Master the Art of the Microwave Cover
Uncovered food items in a microwave can lead to an explosion. When the food heats up, the steam causes grease on the inner walls.
To keep the microwave clean, use a ventilated, food-safe silicone or BPA-free plastic microwave plate dome. These covers stay on the plate and let the steam vent from the top while trapping any flying splatters.
If you can’t find the cover easily, then go for a sheet of unbleached parchment paper, a clean paper towel, or a microwave-safe ceramic plate. Avoid plastic wraps to cover food.
2. Implement the “Immediate Wipe” Habit
When a splatter slips, the bad thing you do is leave it there. When food spills cool down, they undergo dehydration with microwave-smooth walls. To avoid such issues, keep a microfibre cloth near the microwave, and once you take out the food, clean the interior of it completely from the inside.
3. Let the Appliance Breathe: The Vent Rule
When you heat liquid-based food items such as soups, pasta, or hot beverages, the high amount of moisture gets trapped inside the microwave, so when you take out the food and close the door, the moisture has no place to go.
This moisture will create a damp environment where bacteria can easily take place, leading to odour and staleness. Over time this moisture can also cause the paint to strip away.
To mix this, leave the microwave door open for 3 minutes after taking the food out. This will allow humid air to go out and dry the interior completely.
4. Rotate Your Foods (The “Outer Edge” Technique)
Microwaves heat foods unevenly, creating hot spots. When you heat a large amount of food, put it on a plate in a ring style and create a hole in the center. This will reheat the food properly.
Microwave Safety: What NOT to Do When Cleaning
While cleaning a microwave, many people make different mistakes, like using the wrong cleaning tool or chemical, which ruins the microwave’s lining, creates dangerous electrical hazards, or contaminates your food. To avoid this issue, make sure you know what not to use when cleaning.
| What NOT to Do | The Hazard / Why It Is Dangerous | The Safe Alternative |
|---|---|---|
| Never use steel wool or metal scouring pads | Scratches the thin, non-conductive enamel coating on the interior walls. Exposed raw metal underneath will cause arcing (violent sparking) during future use, which can ruin the magnetron or start a fire. | Use a soft microfiber cloth or the soft side of a non-scratch cellulose sponge. For tough spots, use baking soda as a gentle, non-scratch abrasive. |
| Never spray liquid cleaners directly onto the keypad | Liquid easily seeps behind the plastic membrane buttons and drips into the delicate control board, causing an electrical short-circuit that can permanently brick the appliance. | Spray a 50/50 mixture of water and rubbing alcohol directly onto a microfiber cloth until damp (not dripping), then wipe the keys down. |
| Never use harsh chemicals (Bleach, Oven Cleaners, Ammonia) | These chemicals degrade the plastic lining and damage the rubber door seal. Furthermore, chemical residues get trapped in the vents and will vaporize into your food the next time you cook. | Stick to natural acids like white vinegar, fresh lemon juice, or a mild, diluted dish soap (like Dawn). |
| Never clean with a dripping wet cloth/sponge | Excess water can drip into the internal venting grates on the side walls or ceiling, reaching the high-voltage capacitor and transformer inside the outer cabinet. | Always thoroughly wring out your cloth or sponge so it is damp to the touch, never dripping wet. |
| Never wash a hot glass turntable in cold water | The sudden, extreme temperature change triggers thermal shock, causing the thick glass plate to instantly crack, shatter, or explode in your sink. | Let the glass turntable cool down completely to room temperature before removing it and washing it in the sink. |
| Never scrape or scrub the mica waveguide cover | The small, cardboard-like sheet on the right-side wall is incredibly fragile. Damaging or puncturing it exposes the internal microwave emitter, rendering the machine unsafe. | Gently wipe the surface of the cover with a barely damp cloth. Never apply pressure or use abrasive scrubs on this component. |
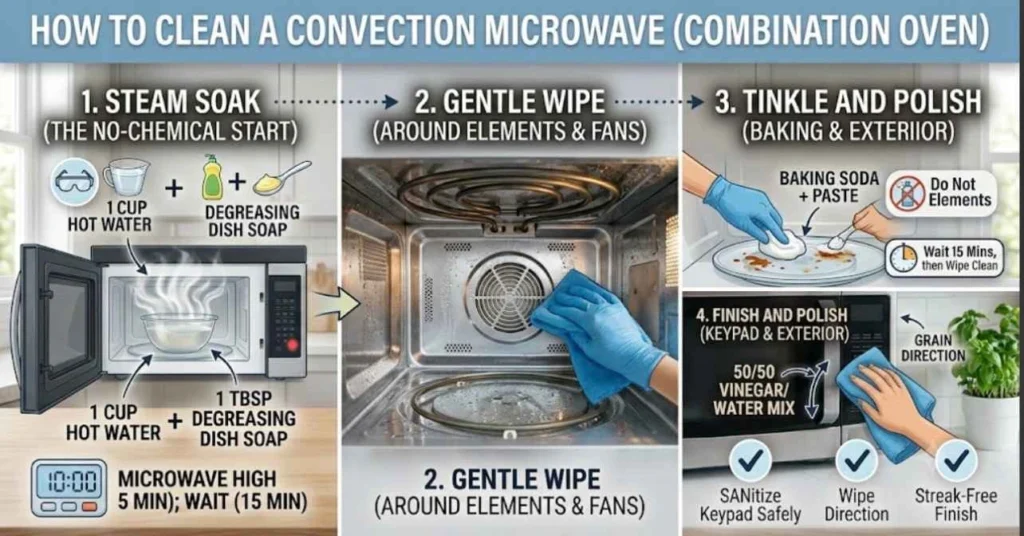
How to Clean a Convection Microwave (Combination Oven)
The combination ovens have a fan and heating element with standard microwave radiation that helps to bake, roast, and crisp food. These microwaves cook at high heat, so the cooking oils and food splatter get baked on and create hard walls inside, just like a regular oven. These combination ovens have elements that can collect grease. However, cleaning these elements needs extra care.
Step 1: The Dish Soap Steam Soak
For this mix, 1 cup of hot water with 1 tablespoon of concentrated degreasing dish soap in a bowl, then put it in the microwave and run it for 5 minutes. This will cause the soap-infused steam. Keep the door closed for 15 minutes so the vapors break the baked fats.
Step 2: Cleaning Around Heating Elements
Never clean the microwave interior when the heating elements are warm; always clean when they are cool. Gently wipe the stainless steel walls with a damp microfiber cloth.
For baked-on grime, mix baking soda and water into a thick paste. Use this paste on grease spots on walls. Let it sit for 20 minutes, then wipe it clean with a damp cloth.
How to Clean a Drawer-Style Microwave
Drawer microwaves are usually installed under the counter or built into kitchen islands. Cleaning them can be a challenging task, especially when you are dealing with a ceiling that isn’t in your line. Drawer microwaves need cleaning from a top-down angle and need extra precautions.
Step 1: The Steam Setup
Since the drawer microwave doesn’t have a rotating turntable, you can place a bowl of cleaning solution that includes one cup of water and 2 tablespoons of vinegar. Put the bowl in the microwave and run it for 4 minutes. Keep the door close for 10 minutes.
Step 2: The Hidden Ceiling Inspection
The ceiling is hidden from a standing view; it can lead to thick layers of stale grease. To check for grease, use a smartphone’s front camera with the flash on or hold a mirror inside the drawer to find the hidden grease. Wipe the top ceiling thoroughly with a damp microfiber cloth.
Step 3: Protecting the Glides and Tracks
The drawer-style microwaves have metal tracks (glides) to protect them; don’t wipe with soap, vinegar, or degreasers. Instead, use a dry vacuum hose attachment or a dry toothbrush to sweep the grease away.
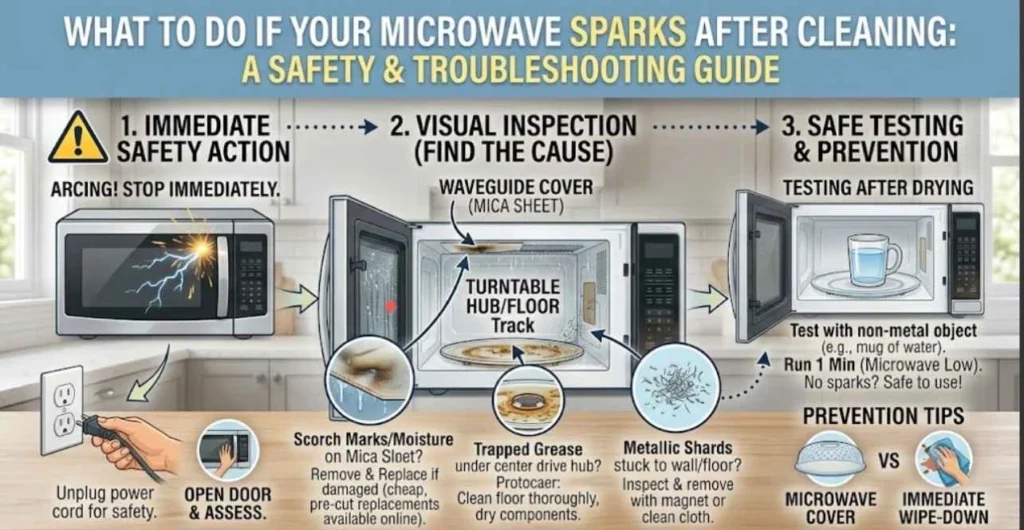
What to Do If Your Microwave Sparks After Cleaning
Once you are done with cleaning the microwave, plug it back in and turn it on and look for bright sparks or hear a loud popping sound. If you hear it, don’t panic; turn it off immediately. It is very common after a deep cleaning.
1. The Waveguide Cover is Wet or Greasy.
The waveguide cover is very small and like a small sheet found at the right side wall of the microwave. It allows the microwave energy to go through while it protects the magnetron tube behind it from grease splatters. Avoid spraying the cover with liquid at the time of cleaning; it leads the cover to scorch, burn, and spark.
Remove the turntable and keep the microwave open for 24 hours. If the waveguide looks black or has a hole in it, don’t use the microwave. Buy a new one.
2. Leftover Metallic Shards from Scouring
If you used a kitchen sponge, the microscopic trace of metal gets stuck at the wall and floor of the microwave. To fix this problem, Use a flashlight to inspect the interior. Wipe the cavity with the help of a microfiber cloth.
3. Missing or Misaligned Turntable Components
If the glass turntable or the plastic roller ring is wet or grease is involved, the microwave won’t work well. To fix this, take the turntable and plastic ring out, then wipe the floor and let it dry. Add the roller ring back. Make sure the glass plate is aligned with the center rotating drive shaft before turning the unit back on.
Quick Safety Note: This guide is for educational purposes. Hot steam can release intense vapors; always keep your kitchen well-ventilated, especially if you have asthma or respiratory sensitivities. Always unplug the microwave before touching electrical parts, and clean at your own risk.
References and Sources
- According to the FDA safety performance standards for microwave ovens, using steel wool or metallic abrasive scrubs can compromise the interior shielding
- The National Institutes of Health Fire Marshal advises that trapped, carbonized grease inside the oven cavity is a major ignition source for electrical arcing
- Environmental health guidelines published by UC Berkeley EH&S highlight that clean, intact door gaskets are critical to keeping microwave energy completely sealed inside…
